Showing posts with label craft. Show all posts

Monday, June 10, 2013

Sewing Smurf


My Smurf never ceases to amaze me. This weekend we collaborated on a craft project I have been thinking about doing together for the longest time.

He drew his own images on fabric and I sewed them into something 3 dimensional and filled with stuffing. Only, my vision was slightly wrong. I didn't do the sewing, the Smurf did.


After learning how to lift the presser foot, manually move the needle, place the fabric and cut the thread he was ready to sew some lines. And then turn corners.


He was busting to bring his fabric drawings to three dimensional life. A tree with bark, leaves and birds to become a soft toy and a tree with an owl surrounded by the Teenage Mutant Ninja Turtles for a cushion.

And so off he went, after carefully choosing his backing fabrics (flannelette for the back of the soft toy as it will be cuddled and the flannelette is soft!). He sewed some parts completely by himself (foot on peddle and guiding the stitching) with verbal guidance from me and some parts with me physically helping to guide the fabric or sewing a line first for him to then follow on his own.


He could not be more proud of the outcome. Nor can I.


He is busy planning his next few creations. Every time I look at these photos my heart feels like it might literally burst with pride.


Sunday, April 07, 2013

Super Stuff - a how to of sorts


A few weeks ago we had an invite to a 5th birthday party. We spend a bit of time with this 5 year old. Her brief was "something in pink or purple and not something for boys". I can do that, I thought. As time drew closer, I felt little inspiration in the way of something to purchase.

Whenever Miss L visits our house, all the dress ups are pulled out and everyone strips down and dresses up. So I hit my pinterest boards looking for some homemade dress up inspiration.


And so, Super L was created. A personalised cape, super powered cuffs, mask for identity protection, shoe wings for flying (inspired by this pin). All reversible.

I do have some issues with Super Heroes; we spend a lot of time talking about how Emergency Services people are the real super heroes. However, we couldn't hold the flood gates closed on the superhero barrage, so The Smurf has lots of generic, homemade dress ups as well as the trademarked super people. And he loves them. So, I was hopeful Super L would feel the same.


I started out writing instructions for each piece, but really it is as simple as drawing the shapes and going from there. It's pretty simple to work things out from the pictures.

A How To of sorts... 

  • The wrist cuffs are rectangles of felt and joined on the short ends with two pieces of elastic attached at each end of the cuff. The cuff becomes a tube that is easily slipped on and off. I based the size on a toilet paper roll - The Smurf has quite a collection of super hero cuffs made from toilet paper rolls.


  • The mask is two pieces of felt sewn together with elastic sandwiched at the outer edges. No fussy turning out and clipping seams, just draw a template, place it on top of two pieces of felt, trace (with a seam allowance), sew and cut out - be careful not to cut the elastic while you're at it.


  • The shoe wings are again two layers of felt. Draw the shape on paper first so you can tweak it until you're happy. Trace, sew, cut. Then punch some shoelace holes for threading onto shoes. 


  • There are endless free cape tutorials on the web. My favourite is this one by Suzy at Floating World. However, the last few times I've made capes, I've used just one piece of fabric, rather than having a separate piece for the neckline. 
  • To make a reversible one-piece cape, I fold a piece of fabric in half length ways and use a kids singlet to get a rough guide on the depth of the neckline and tweak a bit deeper from that. Then simply draw the rest of the shape as you choose. Place the cut out piece face down on your second piece of fabric. Pin and sew around your shape, leaving a gap for turning in the right way. Clip your curves, turn in the right way and top stitch. Sew small pieces of velcro at the neck joins (remember Edna in The Incredibles says "No Capes!" so it needs to easily rip apart if it gets caught). 

How do you feel about Super Heroes? Have you kept them at bay at your place or is it all Pow! Bang! Biff! Boom!

Sunday, September 12, 2010

Happy 5th Birthday


I've never done a blog birthday post - well not that I can recall. But, this year this little blog turned 5. Yep, five. I celebrated by heading off on a craft weekend with some amazing, inspiring, clever and down right hilarious crafty women.

I'm pretty amazed that I've been blogging for five years. It's great to look back and see the new skills I've learned - and the craft I've attempted that I never thought I would 'get' (hello crochet). And that's all my blog was ever supposed to be - a way to keep track.

Anyway I won't go on and on but during the five years the best and most surprising thing I've got from my blog is a connection with you. I think my thoughts posted here at Whip Up sum it up pretty well.

Tuesday, February 02, 2010

Playing with Vinyl a tutorial.


New school adventures - for the nephew, not the Smurf and excitement levels are, apparently, at absolute fever pitch. It was certainly time for him to venture a little further from the nest and embark on the school adventure. I thought I'd aid him in his adventure with a pencil case with his name on it.

It went down a treat. I felt like a bit of a fraud; the whole thing was deceptively easy. That fear I'd been holding on to of sewing with vinyl - needles snapping, machine munching vinyl, stitches slipping - was completely unfounded. The project took 30 minutes from go to woe.

So, go try it yourself:

You need vinyl, a zip, scissors, sewing machine

1. Cut out 2 matching rectangles of vinyl for the outside of your pencil case. Make the longest edge slightly longer than your zip. These will be the sides of the pencil case.

2. Trace your letters onto the back of vinyl scraps or small pieces, I just used a felt tip pen. Remember to reverse the letters. I used the letter templates in this Beeper Bebe project by the very talented Holly.

3. Cut the letters out and arrange them on one of the large rectangles. Play around with the placement until you are happy. Starting with the first letter, carefully hold it in place (don't pin) and using a zigzag stitch sew to the rectangle. Repeat with each letter.


4. Using a zipper foot and with right sides facing sew one side of your zip to the top edge of your rectangle. Repeat with the other side of your zip and other rectangle. Here's a good zipper tutorial if you're scared of zippers, it's OK I once was too!

5. On the right side, of each rectangle top stitch your zipper seam.

5. With rights sides of your rectangles facing, sew the remaining three sides together (see that tutorial up there in point 4 if your not sure how to do this).

6. Using pinking shears, trim the excess. Trim diagonally across each corner, being careful not to snip the seams. If you don't have pinking shears, use an edging stitch to sew around the edge of the three sides you just sewed.

7. Turn your pencil case right side out, poke the corners out well. And you're ready for some fancy pants new pencils to put in that case.

Saturday, January 16, 2010

Happy New Year


I've enjoyed my blogging break. Have been keen to come back here but there was so much fun, food and festiveness over the break that I wasn't sure where to start. Instead, I'm sharing some highlights in mosaic form.

1. Chow Down, One piece of meat at a time.
2. Hey You, The New Police
3. Pudding Time, Sadie's recipe this year, Yummo. Success and made with Grandma's pudding cloth this year.
4. Smurfs!, for the Smurf
5. Beach, it's where the sun, surf and sand are
6. A pub with a view, Best view from a pub on the East Coast. Apart from that bin. And it's like stepping back in time. Shame it's falling apart and destined for "development".
7. Sydney Sky January 8 2010, Hello sky from our backyard.
8. Keyboard Playing Cowboy, The title speaks for itself. The Smurf requested a Cowboy Hat, a Cowboy Shirt and a pink car from Santa. Santa's workshop struggled with the pink car, but eventually managed to make all toys according to order.
9. New Bikes,
10. New Bike,
11. For Santa, Salt and Vinegar Chips, Beer and a carrot (teeny homegrown) and water for Rudolph. Just like it was when I was a girl.
12. Gingerbread House - First ever, So happy with this, despite the wonk. I've been wanting to make one of these for years but always worried about the humid weather. Don't know why I waited so long!
13. Gingerbread House - First ever,
14. Gingerbread House - it's where the biccie boys live,
15. Wrapped, We downloaded wraps and gift tags this year. It was the best. Thank you Auntie Cookie and freebie gift tags (can't remember your link).
16. Summer Salad 3 ways Before, After being vego for almost a decade there are always multiple salads on our table at a BBQ.
17. Summer Salad 3 ways After,
18. Time to Celebrate, A special celebration for a special friend with a craft day spent under the frangipani tree sipping champagne.
19. So funny Time to down needles and cut the cake birthday girl.
20. The Toy Society my Toy Society Christmas Drop; 10 toys on a tree!
21. The Toy Society
22. The Toy Society - someone finding!
23. The Toy Society - Back 2 hours later and they were all gone.
24. The Toy Society - a finder with her new toy on a trip to the zoo.
25. A Picnic Quilt Built for Two.

And on resolutions, like most I don't do them - as such - but you know, be more .... fill in your blank here.

Tuesday, November 03, 2009

Christmas Thinkings


I'm making Christmas plans in my head and getting a little excited about things. This year will be the first year the Smurf really gets Christmas. Plus, last year we were in transit and didn't have our stuff, so it feels nice to be thinking about where to hang our christmas decorations.

I'm ahead of myself a little as usually I don't start thinking and doing until the week or two before Christmas Day.


Our supply of homemade decorations has been building over the years, but this year I have plans to boost the supply somewhat. As you can see above, we're well sorted for stockings, so this year homemade plans include:
  • Advent calendar, and lots of fun things to put in for daily discoveries. Do you have any things you put in your calendar that are popular at your place?
  • Soft toy Christmas trees to go on the "mantle"
  • Christmas Cards - a different design this year though, what do you think of a "bauble" sewn on to the card with a big cross through it?
  • An assortment of baked goodness Pudding, cake, biscuits (see gingerbread men below), sweets, neenish tarts, maybe some jam and infused oils
  • Some new red work decorations for the tree - although maybe I'll use green this year? Green work. Doesn't quite have the same ring to it
  • A wreath for the front door
  • A handmade christmas present for the Smurf
  • Oh and a bunch of toys for The Toy Society's World Wide Christmas Drop! I've got some special plans for that one. Have you signed up yet?
OK, now let's see if that keeps me accountable. Oh and did I tell you I'm a sucker for over-filling my to do lists?

Monday, October 19, 2009

More Hats - and a better way to finish


Yes, yet another hat. Perfect for sipping (baby) cino in the window of your favourite local cafe.

As promised, an explanation of the very simple work around on the "Lazy Day Hat" pattern. The final part of the pattern asks you to unpick the seam in the band to turn the hat right way out. You then hand sew that seam back together. Of course this is perfectly fine, but personally I find the finished seam a bit messy this way - but maybe that's more to do with my hand sewing than the pattern?

Anyway, instead of unpicking the seam, just leave a gap when you attach the brim to the band and turn the hat through the gap. (look Ms Fruiti - pins!)


Then just carefully tuck the raw edges under and top stitch all the way around the seam joining the brim and band, making sure you close the gap.


Are you making hats?

Saturday, October 17, 2009

Personalised Kids Bday Party - Lolly bags


A little bit more to share from the party. This time the consumables in the lolly bag, Biccie Boys and the actual lollies.

I didn't want to fill the lolly bag with rubbish, but at the same time I didn't want to deprive the kids (um parents?) of their fill of yum. So, I figured the Smurf's favs would be easy and a few lollies for the kids old enough to eat them.


I thought that having the consumables in little bags would help the kids feel like there was more to the lolly bag experience.


The bags were bought many moons ago probably from Spotlight or Lincraft. The stickers were a cinch. Just print your sticker onto label paper, cut, peel and stick. Download my templates here or use your software program of choice to lay your stickers out.


Next up, homemade colouring books.

Thursday, October 15, 2009

Personalised Kids Bday Party - Homemade Stickers!


Thanks for all the party love on the Happy Smurfday post. As promised I wanted to share some of the easy ways I personalised the party. Don't freak out, I'm by no means recommending some crazy arse approach to hosting your next kiddie bday bash, oh no. I'm more of a half-arse approach lady so never fear this will be easy peasy.

So, the stickers. These went into the "lolly" bags and as labels on the pencil packs.

There are two ways you can do these at home, with a Xyron Sticker Machine or label paper. I used my handy dandy little Xyron machine, which I bought years ago and have never really used for anything other than playing around. You can pick them up at Lincraft for $12.99 (complete with sticker paper cartridge).

You also need:


- Images for your stickers. You can download my sticker templates here.
- paper to print your stickers on, high gloss photo paper if using the sticker machine, or label paper.
- scissors - or a circle cutter - to cut your stickers out
- baking paper if you're not using a sticker machine

1. Layout and print your Stickers
Use whichever software you are comfortable with to layout the graphics you want to make into stickers. I'm a simpleton and use word. Gasp!

I used the same vintage embroidery pattern I used for the invites and coloured the image in using the "paint" program on my laptop. I then resized the image and imported it into word along with some free icons. I also added a sticker with the name of each kid.

Or, to save time, just download my template here.

If you're using the sticker machine, print onto the high gloss photo paper - I find this gives a more durable and shiney finished sticker that looks "more like a sticker", but feel free to use paper of your choice.

If you're going with the label paper, print your stickers on there.

2. Cutting
Cut the stickers out taking care to be neat. Check the width of your sticker to make sure it will feed through the machine without touching the edges of the channel you feed the stickers through.


3. Get some sticky on your sticker.
For the sticker machine, feed your sticker in the gap on the top of the machine. This puts the sticker between the backing paper and the sticky layer.


At this point you don't need to be too careful about lining things up as you can peel the stickers and reapply them evenly along the backing paper once you've finished each batch.

Gently pull the sticker through the bottom end while you continue to carefully push the sticker through the top.


Tear off your sticker and rub, rub, rub.


This makes sure the sticky sticks to the back of the sticker.

For label paper, carefully peel the backing paper off your sticker and arrange on a strip of baking paper.

Da dah, homemade stickers!


Now, don't wait for the next birthday party, go make stickers! (Look out for the Lolly bag and Biccie Boy stickers next post)

Sunday, June 28, 2009

Tweak Tweak


I accidentally left my (new) camera in the back of a hire car on Thursday as I made record time getting to the airport and checking in after a marathon work trip (new personal record negative 5 minutes to check in close and I still made it including oversize baggage) .

Bugger. Someone car cleaner got an ace tip that day.

I'd show you photos from the Sunday Craft Room, but I have no camera. I'd show you photos of my amazing score from Lulu Carter (she with the new chooks) but I have no camera. I'd show you photos of the scrumptious bake-orama results displayed ala Royal Easter Show style at today's Craft Room, but I have no camera. Sick of this yet?

Instead I did a little blog tweaking over there in the side bar. Nothing special, but you can find my recipes a bit easier now. And if you're ever trying to find me and I'm not about? I'm probably lunching with one of those ladies in that list over there.

Saturday, April 04, 2009

Blockhead


matchy matchy, originally uploaded by SadieandLance.

In need of some external arse kicking to get me crafting again I decided to sign up for the Chaletgirl Block Swap. And as suspected it well and truly kicked my arse into gear (eventually).

I was on a self imposed crafting ban until I found a place for all my craft materials and miscellaneous junk/paper work/ hundreds of metres of assorted useless cables (thanking Mr Sadieandlance for that one). So when I saw that the other blockheads were putting me to shame I swept up the crap and found a spare drawer to shove all those miscellaneous cables.

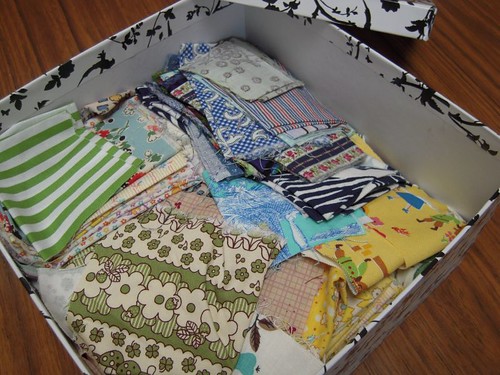
I raided the scrap box and off I went.

And my scrap box is pretty on the inside and outside so it's extra-enjoyable to go scrap fishing. But my pretty scrap box isn't the only reason I'm enjoying being back at the machine for, you see, I have a brilliant new sewing desk, but that deserves a post all of it's own (but I should say thank you here to Grandma!)

In case you're interested here's the fabric I sent off to be distributed to the other blockheads.

Can't wait to see what comes back my way - after each participant teams it with their fabric of choice.

Tuesday, March 17, 2009

Get your playdough on


Excuse me but I made playdough this week. Does that make me a good Mum? (rhetorical question) It was fun and a nice little work out for my arms, plus the end result kept The Smurf quite while I played with some real dough.

Despite the internets telling me not to no-sirey-under-no-circumstances-ever-ever make more than one colour, I did (I'm hardcore like that). Birds to you internets. I've stored them separately and The Smurf can just play with one colour at a time. Unless we're feeling really rebellious then he can play with all colours at once and make his own brown playdough. Nothing wrong with brown.


Despite the fact that people have been making their own playdough for eons I still had to make friends with google to find a recipe. I learned that it's pretty much uniform around the world and varies only by cooking or not and cream of tartar (makes smoother dough) or not. In the end I used a recipe found in a collated cookbook I got from Grandma - one of those local school fundraising things.

To save you time, should you have the inclination to make playdough, here's the recipe. (PS if you choose to include the Cream O.T the recipe's on the side of the tub).

You need:
  • 2 cups plain flour
  • 1 cup salt
  • 3 TBsp Cream of Tartar
  • 2 TBsp cooking oil
  • 2 cups water
  • food colour (as many as you like, rebel)
You need to:
- Mix dry ingredients in a saucepan and oil (and your colour if you're using just one) and mix in water gradually.
- Cook over a low heat, stirring until the mixture starts to leave the side of the pan and become like dough (dah).
- Remove from the heat. Grab some dough, add a colour and knead until the colour is incorporated and the dough smooth.
- Repeat for each colour.
- Ready.

Store in the fridge in a container or in zip loack bags. Tell your Smurf to try not to eat it.

Saturday, February 28, 2009

Ludicrous Cake Installations


I made a ludicrous cake installation today. Ludicrous! 4 layers! Custard, dense coconut cake, raspberries, passionfruit. Mmm-mmmm.

I made it for some craft ladies who came to play. Great day, there was even trash dip (oh there always is!) and homemade sausage rolls. As happens at these occasions all world issues were addressed - inappropriate whacky mother in law antics and deconstruction of Yo Gabba Gabba included (Suzy YGG is touring!!). Fun for all. We missed a couple of nice ladies and if I could combine my Sydney and Melbourne lives well I might have liked to invite some other sweet craft ladies. And you, of course, I'd invite you too -don't worry my imaginary craft house is huge and can fit you all.

Now, it's time to knit. Despite the fact it was a craft day I knitted only 4 rows on a baby cardy which I then ripped out because I didn't like the colours. What do you mean Attention Deficient Crafter? Shame on you for thinking such things about me, I can build ludicrous cake installations. ahem.

Thursday, November 06, 2008

Slowly slowly slowly said the Sloth


This will be a photo heavy post. We've had a rough week involving a late night dash to emergency followed by an anxiety ridden 36 hours. We met every possible doctor at one hospital before taking a 3.30am ride in an ambulance to another hospital. Needless to say it was a difficult 36 hours that, at the time, felt more like 36 weeks. Asthma is a nasty, nasty beast, especially in a child. Thankfully we're all OK now and slowly catching up on lost sleep, mending our fragile emotions and keeping a careful ear on breaths in and out.

Now about that craft weekend adventure. This could all be a bit random again.

Above? That's about all I managed to achieve on our craft weekend, as I was accompanied by the Smurf. Still the feet up time and good company were much appreciated.

This below? That's the amazing view of the Blue Mountains and Megalong Valley from our kitchen window. The lounge room view was even more spectacular. Look carefully you can see some sheer cliff faces. Amazing.


We ate some trash dip. This is famous in my real life. Everyone loves some trash dip. Best dip ever. EVER.


The Smurf got to wear a beautiful yarn necklace. Lucky for him our weekend housemate loves him enough to indulge such crazed accessorising.


Here's our beautiful housemate winding some yarn with her yarn assistant


Oh, I did manage to make myself a yarn cake


Um this is how you should eat trash dip - pile it up baby! No delicate dip in dip out, get as much as you can on there before it gets eaten by everyone else.


And a little bit of Toy Society stuff.


Beyond craft there was chatting, music, great company and a beautiful view. More than enough projects to keep us occupied. I even managed to cut some fabric for a log cabin project. Wooh.

Friday, August 22, 2008

Flashback Friday


Sadie and me

Woo hoo it's Friday night, the Smurf is sleeping soundly and there's more than enough hours between the last and next breastfeed for me to crack open a second beer.

Today the Smurf and I had a most bodacious (ha I think I only used that word care of the first beer? Who hasn't wanted to use that word more often? Only me? Well never mind.) day out at the Stitches and Craft show kissing cheeks with lots of our crafty friends new and old. The Smurf even had a spot role as sales assistant at the Cheeky Beaks stand. Not sure if he was a successful assistant so much but he had fun kissing the shop keeper!

I spent pretty much all my time up at blog-central Living Creatively, it was terribly hard to tear myself away from all those scrapbook stands but I did what I thought was right *Scoff scoff*.

PS You know how I told you about my "Sister"*? Well she won a Bronze Medal! Woo Hoo!!!!

*She's not my real sister, but is like a sister..long story. My actual sister (and my "sister") played water polo in the Athens Olympics. We went to watch; best holiday ever.

Tuesday, August 19, 2008

Buttons buttons oh yeah

Look what dropped into my life recently courtesy of a merchandiser friend, a big fat bag


of buttons!


Sure I, like, you know, like buttons, but I've never really felt that crazy button obsession that seems to plague so many crafters. Sure I enjoy venturing to Button Mania or All Buttons Great and Small every now and then. But, believe it or not, I can walk away having just admired and not purchased - unlike at a wool or fabric shop.

Now though I have my own button shop of sorts at home things have changed a little. I feel a little bit more excited about buttons. I even have some favourite buttons:


And it gives me just the slightest little happy buzz to know that I can go to my very own button shop should the need arise.

I'm willing to share too! So, leave a comment about buttons - anything you like, just do it before next Wednesday 27 August. I'll send one of you a selection of my favourite cards.

Saturday, July 12, 2008

Happy Birthday parties... did I tell you the party is for twins?

It's raining birthday parties this week, little girl birthday parties. I thought some Black Apple action would be in order for the one year old and the 2 year old. The parties were today back to back and on opposite sides of the city.

Present making was all on track, fabric cut, stuffing ready to go, machine plugged in. Roll clock forward through dinner, a couple of sneaky beers, some feet up time on the couch to 9.30pm when Mr S+L has a brain wave. I think the 2 year old is actually twins. What the fark I say? Twins? You forgot to tell me? Now I need to make 3 dolls?! Geez I was about to go to bed. So I drag him upstairs thrust the scissors in his hand and demand: "CUT" "HURRRRRRRRRRRY!". And finally we got to bed ready with three dolls ready to be stuffed and finished in the morning after breakkie.


I allocated the travel time to the twins' party across the city for final sewing together of gaps and stitching on the faces. But um I forgot to account for time to get car sick. Blag. Imagine that, getting car sick for the first time in your life because you're desperately trying to finish off the last minute hand made pressies for the twins you thought were only one child just a matter of hours before. Arrggg.

I had to contemplate arriving without a present(s) to a lovely party in a wonderfully warm welcoming house full of people I'd never met before (Mr S+L's work friend) - the sheer embarrassment. Lucky I found a quiet 5 minutes to make a phone call escape to the car to finish and wrap before we had to leave.

And we made it to the second party back on the original side of the city, albeit 10 minutes before the finish time. But for obvious reasons I have no finished doll photos to show.

The Smurf couldn't have cared less about the present debacle and thoroughly enjoyed himself at both dos, laughing, making friends with a 6 week old staffy puppy (oh and other kids), eating tiny morsels of bday cake and doing some context appropriate clapping at the clown.


And so begins our new life on the kids birthday party circuit. And I'll forever more check and double check the number of children celebrating at each event.

PS We bagged the lolly bags. Sweet.